Friday, May 27, 2011

a new bag (again)

Hey you guys! Back with a project I finished WEEKS ago, but have been too busy to post! I just finished my last final from my first year at college, yay! Plus my brother bought me a belated birthday present (Sim 3) and let's just say it takes over your real life a little bit, hahahaha


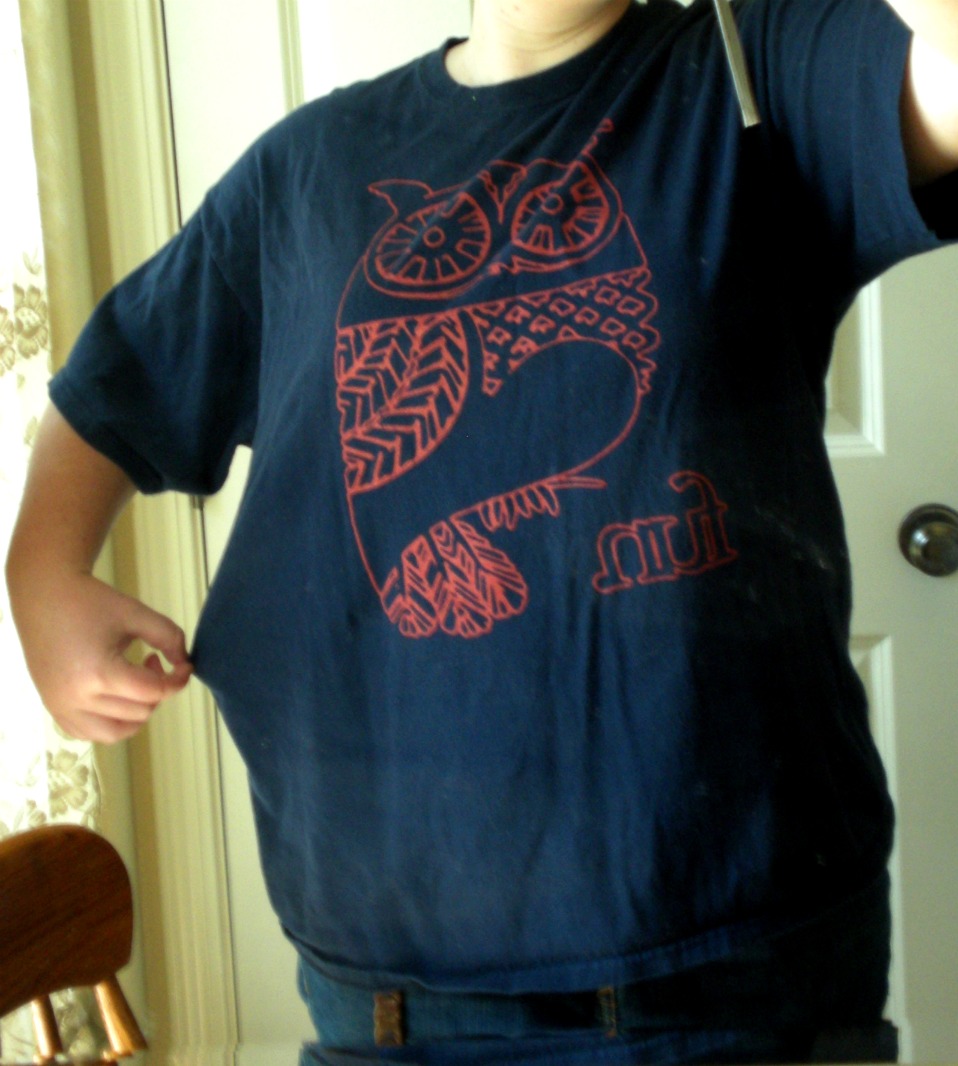
Anyway, onto the project! A year or so ago, I went to see one of my favorite bands, fun., in concert. Their shirts were relatively cheap and had great designs, so I really wanted to buy one (or two, ha). One of the styles they had in my size, but the other one only came in XXS or XXL. I really, REALLY, liked this design so I opted for the XXL but I never really wore it because it was so frumpy.
Now, I've been needing a new tote bag since my old one was so used, the orange was turning brown (yuck!). Instead of buying one, I decided to make my own! Right away I knew I wanted it to be reversible, and my sister just happened to give me the perfect fabric the month before.
So, I began cutting it up and pinning it! Now, there was something a little different about this sewing project: I SEWED MOST OF IT MYSELF! That's right, my mom actually showed me how to use the sewing machine and most of the sewing I did myself. (so, some of the lines were a little wobbly, ahah)

The was I made it reversible was by first sewing the front and back of the outside together, and then the front and back of the inside together. I then put one part in the other part and ONLY sewed the top edge, with two different sewing lines; one was really close to the edge and one was about 2.5 inches down. I made the straps with only the fabric, and sewed it beween the two shirt material and the fabric so that it looks the same no matter what part is showing.

And here it is!!!
The proportions are a little weird (it's so long!) and the owl was  higher up than I anticipated. But hey, practice makes perfect, right?

 Now I'm going to be on the lookout for shirts with cute images at Goodwill so I can make more of these cute things! And it's so handy, the weird length actually makes it perfect for my laptop, and it was also perfect for all my bath stuff when I went camping. (Unfortunately, my shampoo opened up and spilled in my bag, but because of the material this is made of, it was perfectly washable! If you do this project, make sure to wash the shirt a couple times before so it won't shrink if you ever have to wash your bag)

xo, caro

Sunday, May 1, 2011

from too-short dress to shirt and headband!

Alright, I was all geared up to post this MUCH sooner but some stuff happened. I had taken all the pictures (before, mid, and after) and edited them all, and saved them on my computer. Since I had them on my computer, I deleted them from the camera. Unfortunately, my computer got a really, really nasty virus and I had to completely restart my computer from scratch, thus losing allllllllll my files, including the photos. Luckily, picnik saves the last 5 photos you've worked on, so i got the befores and afters but lost the mid-way photos, ughhhhhh but it's pretty easy to describe.

ANYWAYS, I started out with this dress:
It doesn't look thatttt nice in the picture, but the print is AWESOME and I really liked it. However, it had shrunk in the wash and was way too short for me. If I can't bend over to pick up my dog's doodie on our daily walks, then I'm not gonna wear it. But I just couldn't give up that beautiful print, so I came up with an alternative. 

I cut off a little more than six inches off the bottom. I cut that long strip into about four shorter pieces, and then cut the width into three pieces. I braided those three pieces together, knotted the ends, and attached each end to a hairband. Voila, easy new head band!!!
 Now there was obviously a lot of the dress left so I asked my DARLING, WONDERFUL, AWESOME mom to sew the bottom edge for me (a lettuce stitch to match the ruffle-y sleeves) and now it is an pretty shirt! I love how it came out.
Also, thanks to my mom for taking this photo~ You're the best!
You can do the headband with any old t-shirt, its a great, cute way to recyle!
xo, caro

Monday, April 4, 2011

It's been so long!!

Ooooh man, how long has it been since I last posted?! I don't even want to check. Anyways, I am back from my surprise hiatus  with a new restyle!

Yesterday I went to the Flea Market, where I got two huge blisters, a coke, and a $3 purse! The purse is what I'm going to focus on~ Here it is before:


As you can see, it's preeeetty simple. Not bad, but also not the bag for me! It was way too plain, so I decided to spruce it up. First I was going to go with navy stripes and make it nautical themed, but thats not really me, so I decided to go with cute teal chevron stripes!To make the stripes even spaced, I lined up tape side to side and then took off every other piece of tape so that all the stripes would be uniform.
Here it is with the tape! Next I mixed up my paints and painted it up~ I also painted the pouch on front a pinkish color. I'm not tooooo sure about the pink, I'm thinking gold might be better.


I sped up the drying process by using a hairdryer. I wanted to take pictures before I went to school so it had to go a little faster. Here it is all done:

 A few things I forgot to mention: I'm sure you can use most  paints, and I just used my regular acrylic paints. Since acrylics are water based, it was really easy to use clean up any little smudges. Just take a clean brush, dip it in water, and scrub at the paint smudge until it's gone~

Sorry this was such a long wait, it won't happen again! :3

Saturday, March 5, 2011

From mens shirt to womens apron!

Ok, I am SO SORRY about the lack of a project last week! To make up for it, I have two this week, one of which I am posting right now and the other which I will post either later tonight or possibly tomorrow.

Inspiration struck for this project when I was walking my dog a couple of nights ago. It was pretty cold so I borrowed my dad's flannel shirt to keep me warm. It was way big on me and I noticed that it was the PERFECT length for an apron! So I decided to ask him if he had any shirts I could have to cut up, and lucky for me, he had this nice shirt that was just a bit too small for him.


Now, honestly, I forgot to take pictures along the way. But what I basically did was put on the shirt and then use a pencil to draw where I wanted the edges to be. Then cut about a quarter to a half inch away from that to leave room for sewing. I also left a strip around where my waist is for the ties. Once you sew it up, you're done! It's that easy.


Now, on me the straps were a little too smal to make a bow; I could only double knot it. So to make it longer, I bought some ribbon and sewed it on! Voila, an adorable bow~

For the next project, I used the cuffs of this same shirt, but that's for later! If you want to try this out yourself and need some clarification (since I don't have as many pictures), feel free to ask~
xo, caro

Tuesday, February 22, 2011

this isn't a project but....

I just wanted to pop in and recommend you to my sister's etsy!! She makes really beautiful, unique jewelry. Most of her pieces can go with casual AND dressy clothing, so it's perfect~ Here are a few of my favorites!


I seriously love those earrings, if I had pierced ears I would snatch them out for myself!!!

Check it out, she is at blueheritage.etsy.com

Saturday, February 19, 2011

If you have left over candy boxes like me...

then this is the perfect blog post for you!!

I know, another week cutting it close to the deadline, but it's here!! This project went through a lot of changes. First, I was going to make little display boxes, but it changed into simple wall art.

Here's what I started out with. Something that most everyone has left over after Valentine's Day, and if you don't, just ask around! Someone is bound to have some that you can use. That's right...left over heart-shaped candy boxes~!

 First of all, I clipped the bow off of the big box. Then I painted them a flat color. Since they are red, which is a hard color to cover up, I started with a left-over bottle of primer. After that, I painted them with some left over paint that was used to paint the door and some shelving in my room, so I knew it would match! It was pretty messy...

Then I just did little paintings on each one! I have a slight bird theme in my room, so I choose to paint a different bird on each one - a sparrow, an owl, and a robin red breast. If you need some reference, just use google image search, that's what I did!


These are SUPER easy to hang. Since they were boxes, you can put two pushpins in the wall (one for each hump of the heart). Simple as that! These next photo's aren't very good because they were taken at night and the light in my room doesn't get very bright...I might take some more tomorrow and replace these ones. But here's how I have mine hanging!

Another idea is to paint cute houses on each one, with the saying 'home is where the heart is!' That's what I was going to do first, but I decided that the birds fit my style a bit more. 
xo, caro~

Saturday, February 12, 2011

Adorable Valentine's Lamp~

This post is reaaaaaaaaaally cutting it close, but it's here! The week has been crazy busy, second week of the second semester and I've already had a ton of homework. BUT I am really happy with the project this week~

Anyone who knows me knows that I looooove Anthropologie! However, they are generally waaaaay too expensive for me, unless something is on super sale. The last time I went, I fell in love with this lamp. Unfortunately, it costs $388!!

So, of course, I set out on a quest to make my own~ I got a lamp and lamp shade from Goodwill for a total of $10. The lamp stand ($6.99) originally came with this weird knitted shade that smelled really bad, so I bought a plain shade that fit it ($3). And then I got to work! Here's the before:

For my paper, I used a book of English Romantic Poetry that I had to buy for my English class senior year, and a book of hands that I bought a few years back. The Anthropologie lamp uses dictionary definitions and they are cut out in rectangles, but in honor of Valentine's Day I cut my paper out in hearts~ I did big and small hearts, but mostly big (because they take up more space, ahaha!)

I used matte medium to paste the hearts overlapping on shade. Before it was all the way covered, it looked sort of gross because it made the shade darker. And I was really messy!

I also had to paint the base. Besides the fact that it was a boring color, some dummy wrote the price on the top of the base in Sharpie! Why would you ever do that??? It had already been painted once, so I didn't prime it, but it did take two coats of acrylic paint. After it was painted the color looked really pretty~


The edges of the shade were a little bit rough, so I used a trim my mom had on the top and the bottom, just using hot glue. Little bows cover up where the edges meet. 

(that's also my favorite part of the lamp! I loooove the holding hands, although looking at it I think it might just be one person's hands. whatever!) Now that it's all done, I think I love it even more than the Anthropologie one! This project may have come late in the week but it is definitely my favorite so far~ 
There are so many variations you can do to make this project all your own!!
xo, caro

Wednesday, February 2, 2011

Make a cute floral brooch~


Hey-o! I've really got to start doing more than one post a week, it feel too weird! My best friend, Brenda, got back from Mexico this week though, and I roped her into being my photographer, so I'm going to start doing a once-a-week 'What I Wore' feature! If you guys don't like it, I'll stop, though, haha.

Alright! I actually made this really early this week, but I have been so busy (school started this week!) that I hadn't had time to upload the photos, let alone write this. The project, itself, it really simple and won't take you more than 5 minutes!

I started out with some felt, a really cheesy pin, and a really pretty button.

Choose what felt you use, keeping with a common color scheme. I used reds because a) the button is a dull red and b) Valentine's Day is coming up! Next, cut your felt into circles, making sure the biggest one is bigger than the button you're using. I only did three layers but you can do as many or little as you want!

It doesn't matter if the circles are ~perfectly~ even. I used three different size cups to measure them. Next, just cut a cute pattern on the edge! You can do a different design for each circle or a more uniform one.
please ignore my ugly unpainted nails!

Just fold up the felt into fourths (or more for the biggest one) and cut the edge like you would a paper snowflake! I did a little different pattern on each one, and on the smallest one I did a heart-like shape in honor of Valentine's. To finish it up, I sewed the button on through all the layers, which also keeps them together. Then, just hot-glue the flower on top of your ugly pin, and there you have it! An adorable flower brooch! You can use it as just a pendant, to spruce up a plain bag, or, as I did, to give a loose sweater a more fitted look. Here's how I wore mine:
 
Can't wait to see how you make this your own! xo, caro

Monday, January 24, 2011

Hang your photos without holes!

A post at the beginning of the week?! I know, crazy! I had this idea on Saturday and happened to have most of the supplies, and the rest I got today, so with out further ado~


I have been looking for cute ways to show off photos and art I've gotten, because there is no room for picture frames. However, just using thumb tacks to hang pictures isn't so cute, besides the fact that it leaves little holes in your lovely art or photos. You can use alligator clips, but I wanted something a little more fun. So, I came up with this easy idea.

All you need are some clothespins, ribbon, and some cute decorations. First, I painted some nice, bright colors. Er, you can't really tell in the photo, but the two that look sort of light blue are actually white, and the ones that look a little yellow are actually bright yellow! Next, I covered them with fake flowers. I just hot glued them on, but I felt they looked a liiiiitle bit plain, so I did a little decoration on the bottom with Sharpies
The colors ended up making them look a little Easter-eggish...oh well, still cute! Then you take a long piece of ribbon and tie little bows on the end. Spread the ribbon flat on a table and lay the clothes pin evenly across, then hot glue them in place.


The bows will cover the pins you'll use to hang them in the wall. Then, just hang it where you want it and clip your photos/art in!


The great thing about this is that you can use whatever you want to decorate it so it can fit your room!

ps: the lovely artwork is by amy and amber

Friday, January 21, 2011

A Litte Bonus Project

Hey guys! I feel so bad about taking forever to get my next project up, and its actually still not done! :( But I have another project that I did before I had my resolution, and I thought I would share that with you today. Unfortunately, I only have the after photos, but really, its obvious to tell what it would have looked like before.

Awhile ago I was given a gift certificate to Michaels, and I really didnt know what to do with it. I was looking up and down the isles and found these cool cut pieces of wood that still had the bark on the sides. They were for engraving with fire or something, I don't really remember. However, for the past few weeks I'd been looking for something to hold my necklaces, and this would be the perfect backboard! I bought one and went home.

Next I bought some knobs from the hardware store. Later my sister informed me that a local store sells vintage ones for $2 a pop! I was a little bummed that I didn't know that beforehand, but you can keep that in mind if you want to do this project! These are my two favorite knobs I got:


I asked my dad to screw 7 holes in the wood for where the knobs would go, then I screwed them in and voila! a new, adorable necklace hanger. Here it is in action!
Cute, right!?!?

Wednesday, January 12, 2011

From sweatshirt to mittens~

Hey everyone! Coming up in February I'm going to go up to the snow, and I was thinking I need a good pair of mittens to weather that cold. But man, it's hard to find cute, warm ones. So of course, I decided to make a pair myself! It started out as this sweatshirt that, while warm and nice, was too small for me.

 I decided this was the perfect material to make my mittens out of. So I cut it up! My first idea was to make them out of the sleeves, but I messed that up. Instead, I made it out of the body, which worked quite well. Its really simple all you have to do is make an outline of your hand, about a half inch away all the way around. Do it at the bottom, so the bottom hem will end up where your wrist goes. It should look like this:
  
Then you just sew on the line! I had my mom do that part for me, because I don't know how to use a sewing machine! (I want to learn soon though.) Then you just them out and turn them inside out. Make sure the cut pretty close where the thumb meets the hand or else it will fold weird. Now you can decorate however you like! I decided to go pretty simple, just three (really cute) buttons on each cuff.

By the way, I'm sorry about all the weird colors! The above photo is the closest to the color of the fabric. And that's it!! Cute, right?!?

Its really great that these are made of sweatshirt material, because its sooooo warm. Most mittens are knitted, and all those are super cute, but those little holes let lots of cold air through. Not gonna happen with these! :)

I'd love to see how you customize yours.
xo, caro

Saturday, January 8, 2011

From peanuts to pencils!

Hey guys~! The first project, aren't you excited? I cut it pretty close to the deadline this week, problems kept coming up!

For this first project, I decided to go with something reaaaally simple, anyone can do it. All you need is a can, felt, scissors and a hot glue gun.  I transformed a boring old peanuts container to a cute pencil/brush/scissors/anything holder! Here it goes.

A while ago, my mom and I were a little obsessed with peanuts. That's where this huge container came from:

I was using it to hold all my colored pencils, but man, was it an eyesore. I got the idea to transform it from this adorable owl dress. One night, my friend Brenda and I spent and hour or so cutting out all these little leaf shapes!
We actually cut out a bit too many, got kind of carried away! Next, just hot-glue the leaves in an alternating pattern. I did the top layer first, then down from there. I only got burned once, woo-hoo!! Here's the end product:

I think it's pretty darned cute! Now, with that peanut container you could peel off the label and there was that shiny silver underneath. I left it that way for now, but might go back and paint it blue later so it doesn't stand out as much!

So there's my first project! Whew~! Let me know if you try it. xo, caro


ps, sorry about the picture quality! I'm saving up for a better camera.